Public Docs
【模型量化】深度学习模型量化 & 量化理论 & 各平台的量化过程 & 硬件加速
【TVM】TI关于TVM的使用测试与分析
【LLM&LVM】大模型开源工程思维导图
SmartSip
【北航卓越工程师】《汽车前沿技术导论:智能驾驶》讲义
【工具链】Yocto使用介绍——使用Yocto创建一个树莓派的系统镜像
【工具链】使用ssh+dialog指令设定服务器指定用户仅容器访问
【推理引擎】一篇关于模型推理的详细对比与学习
【推理引擎】关于TVM中的Schedule优化详解(On going)
【LLM微调】使用litgpt进行私有数据集模型微调的测试总结
【TVM】在TVM Relay中创建一个自定义操作符
【STT+LLM+TTS】如何使用语音转文字模型+大预言模型+语音生成模型完成一个类人的语音交互机器人
【RAG】 通过RAG构建垂直领域的LLM Agent的方法探索
【RAG】GraphRAG精读与测试(On going)
【AI Agent】MetaGPT精读与学习
【AI Base】Ilya Sutskever 27篇必读论文分享清单
【Nvidia】Jetson AGX Orin/ Jetson Orin nano 硬件测试调试内容(On going)
【BI/DI】LLM Using in BI Testing Scenario (On going)
【Nvidia】How to Activate a Camera on Nvidia Platform in Details
【RAS-PI】树莓派驱动开发
【行业咨询阅读】关注实时咨询和分析
【mobileye】2024 Driving AI
【mobileye】SDS_Safety_Architecture
【yolo】yolov8测试
【nvidia】Triton server实践
【alibaba】MNN(on updating)
【OpenAI】Triton(on updating)
【CAIS】关于Compound AI Systems的思考
【Nvidia】关于Cuda+Cudnn+TensorRT推理环境
【BEV】BEVDet在各个平台上的执行效率及优化(On Updating)
【Chip】AI在芯片设计和电路设计中的应用
【Chip】ChiPFormer
【Chip】关于布线的学习
【Chip】MaskPlace论文精读与工程复现优化
【gynasium】强化学习初体验
【Cadence】X AI
【transformer】MinGPT开源工程学习
【中间件】针对apollo 10.0中关于cyberRT性能优化的深度解读和思考
【Robotics】调研了解当前机器人开发者套件(on updating)
【Robotics】ROS CON China 2024 文档技术整理与感想总结(上2024.12.7,中2024.12.8,下场外产品)
【algorithm】关于模型、数据与标注规范的平衡问题
【nvidia】DLA的学习了解与使用
【nvidia】构建nvidia嵌入式平台的交叉编译环境(其他环境平台可借鉴)
【2025AI生成式大会】2025大会个人总结
【Robotics】 Create Quadruped Robot RL FootStep Training Environment In IsaacLab
【Robotics】如何一个人较为完整的完成一个机器人系统软件算法层面的设计与开发
【VLM】读懂多模态大模型评价指标
【VLM】大模型部署的端侧部署性能与精度评估方法与分析
【Nvidia】Jetson Orin 平台VLM部署方法与指标评测
【Database】向量数据库
【SoC】性能与功耗评估
【MCP】MCP探索
文档发布于【Feng's Docs】
-
+
首页
【RAS-PI】树莓派驱动开发
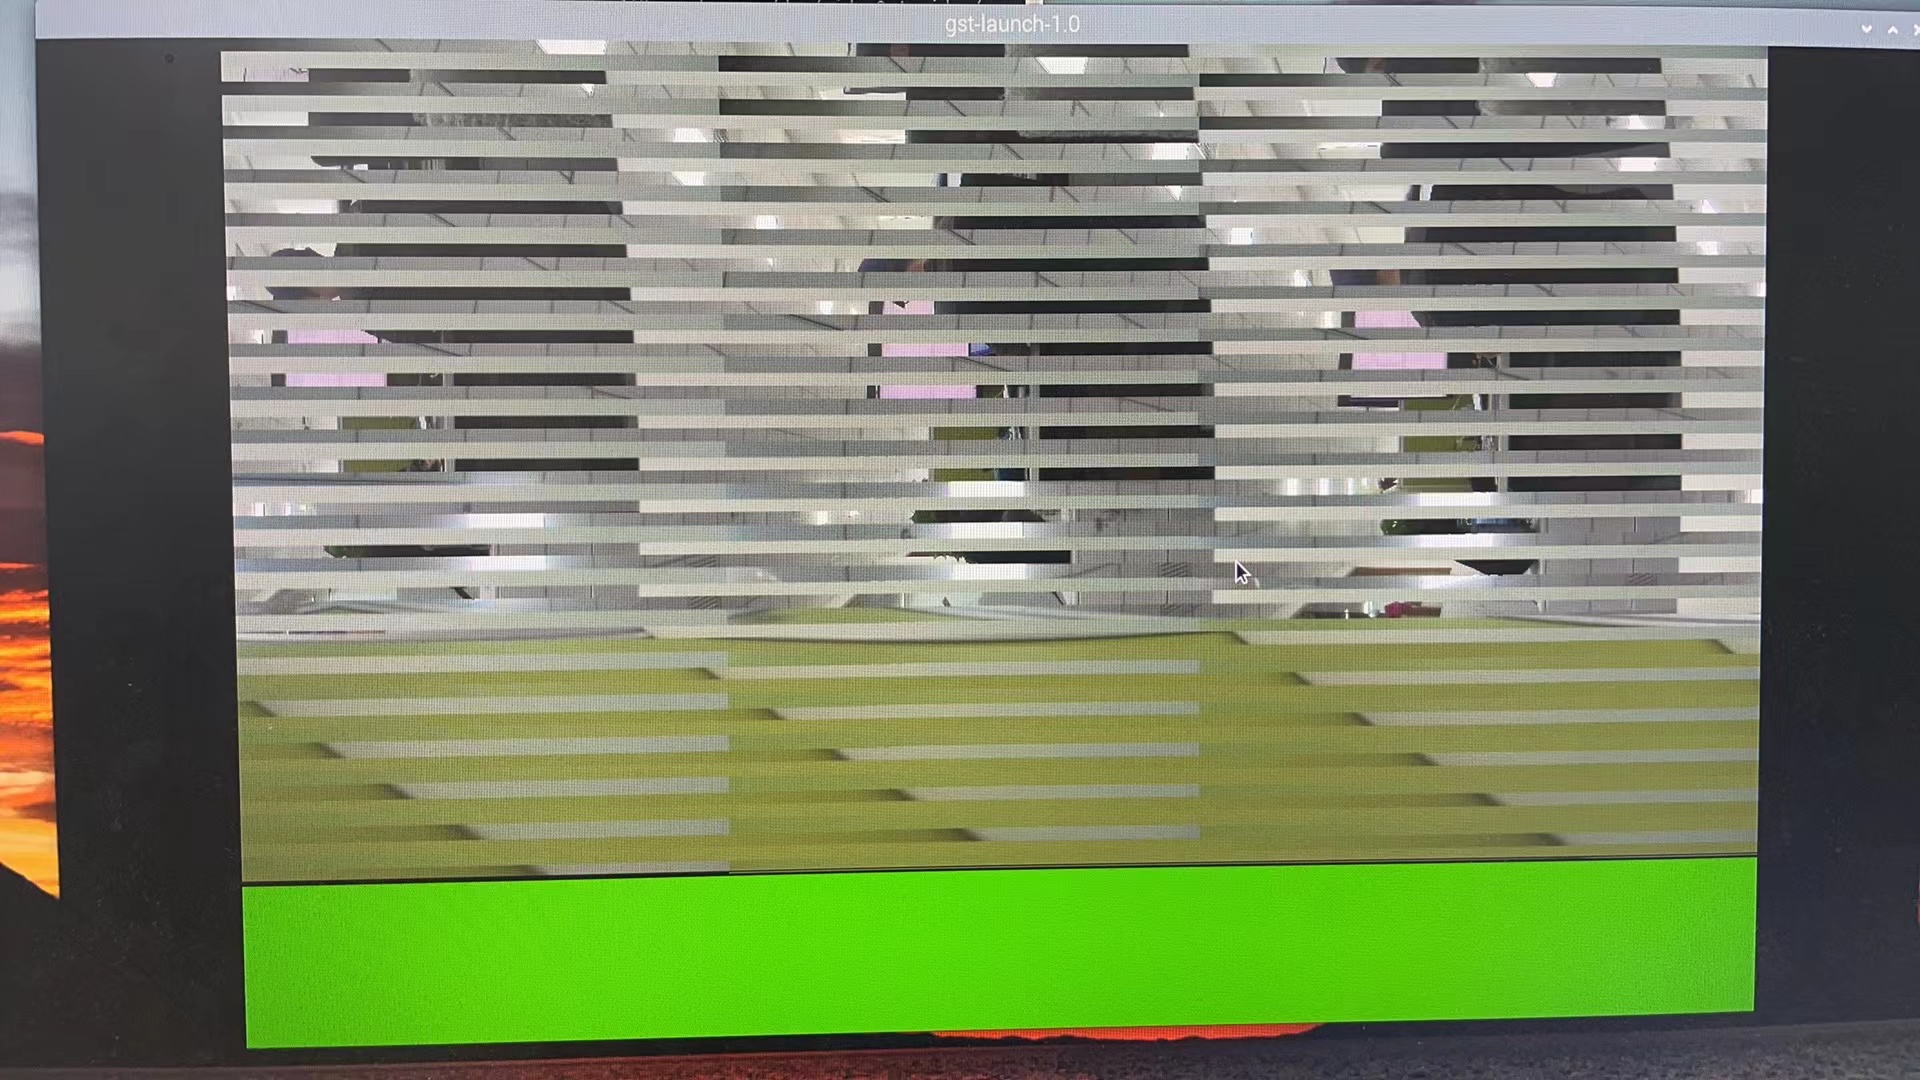
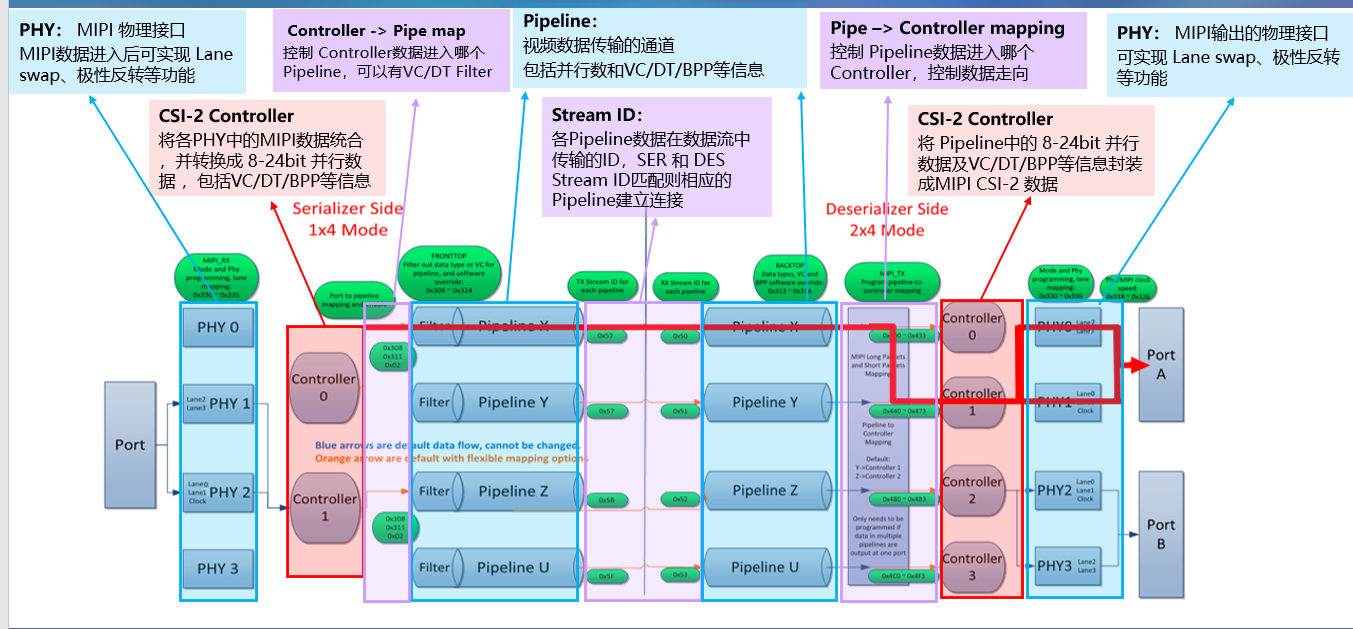
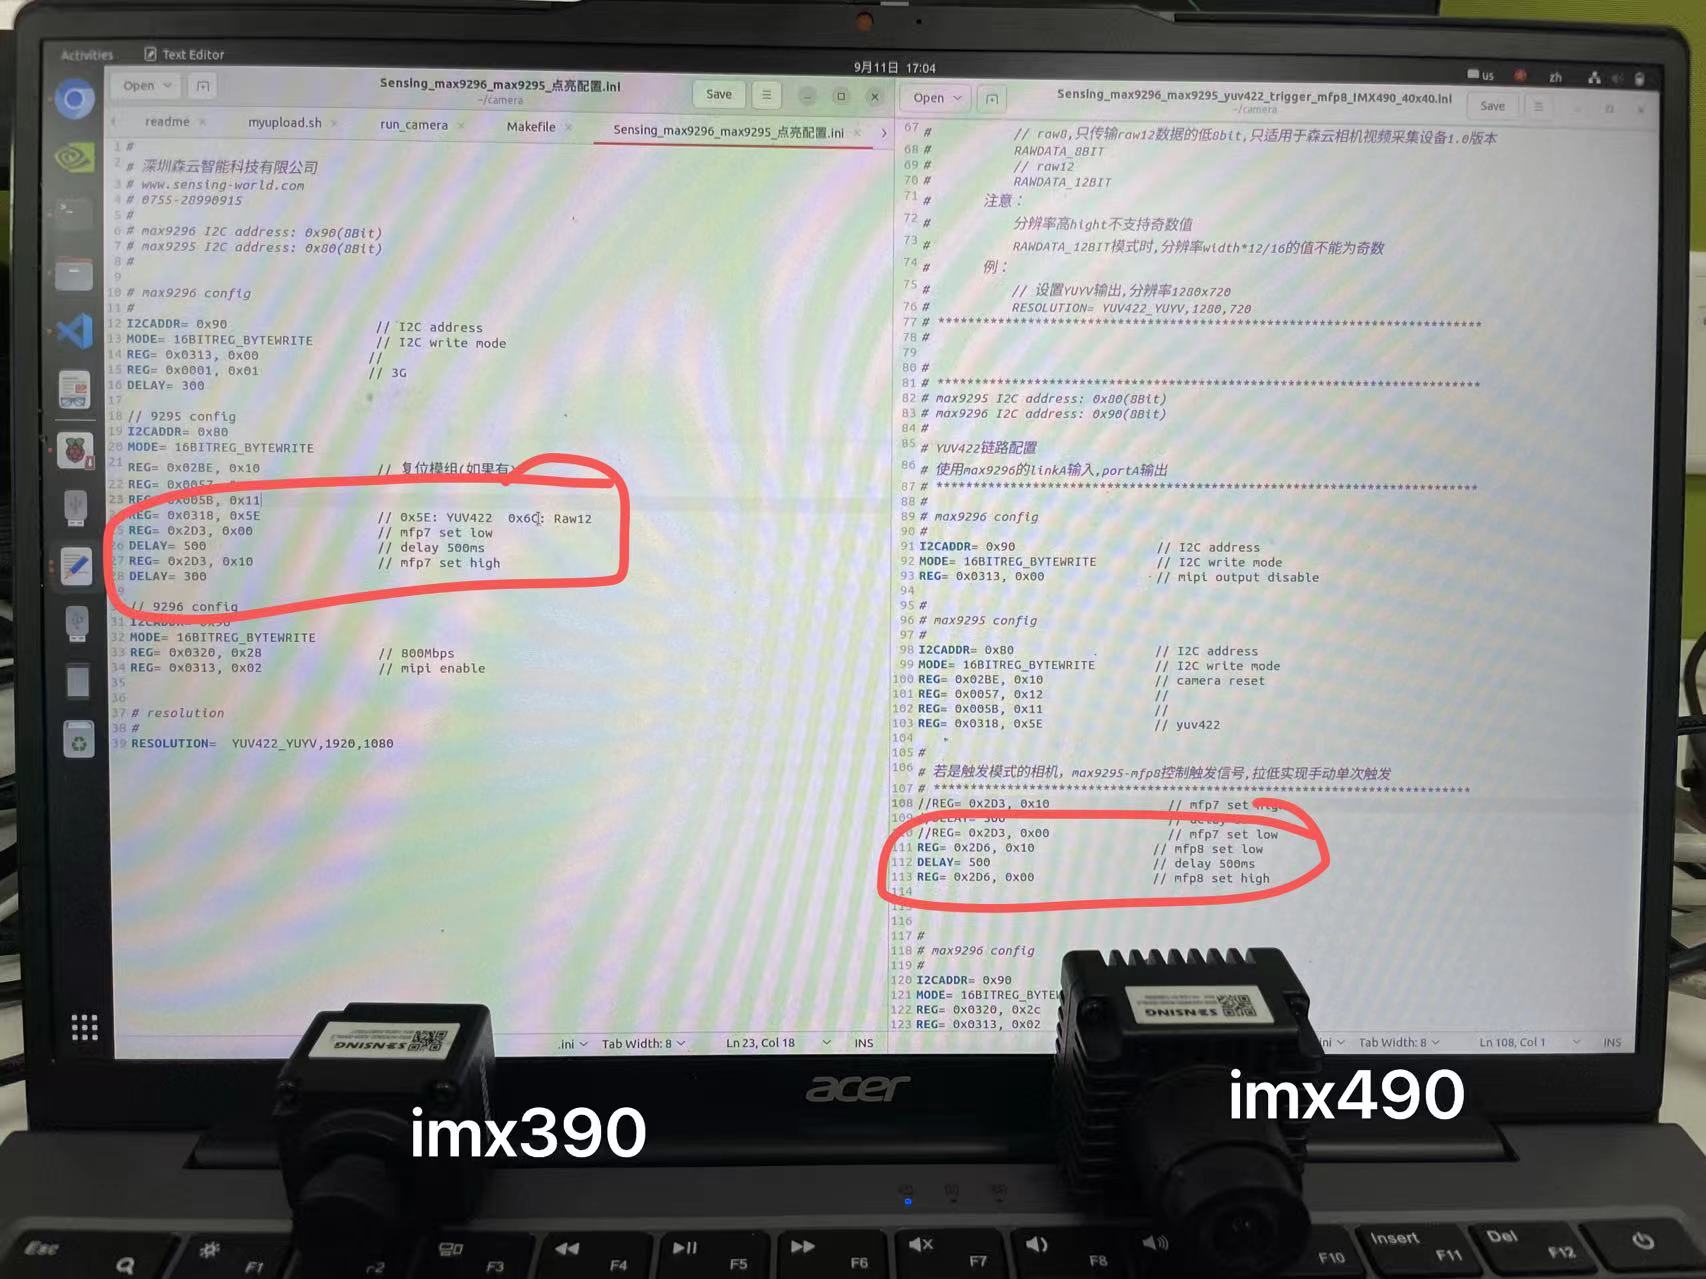
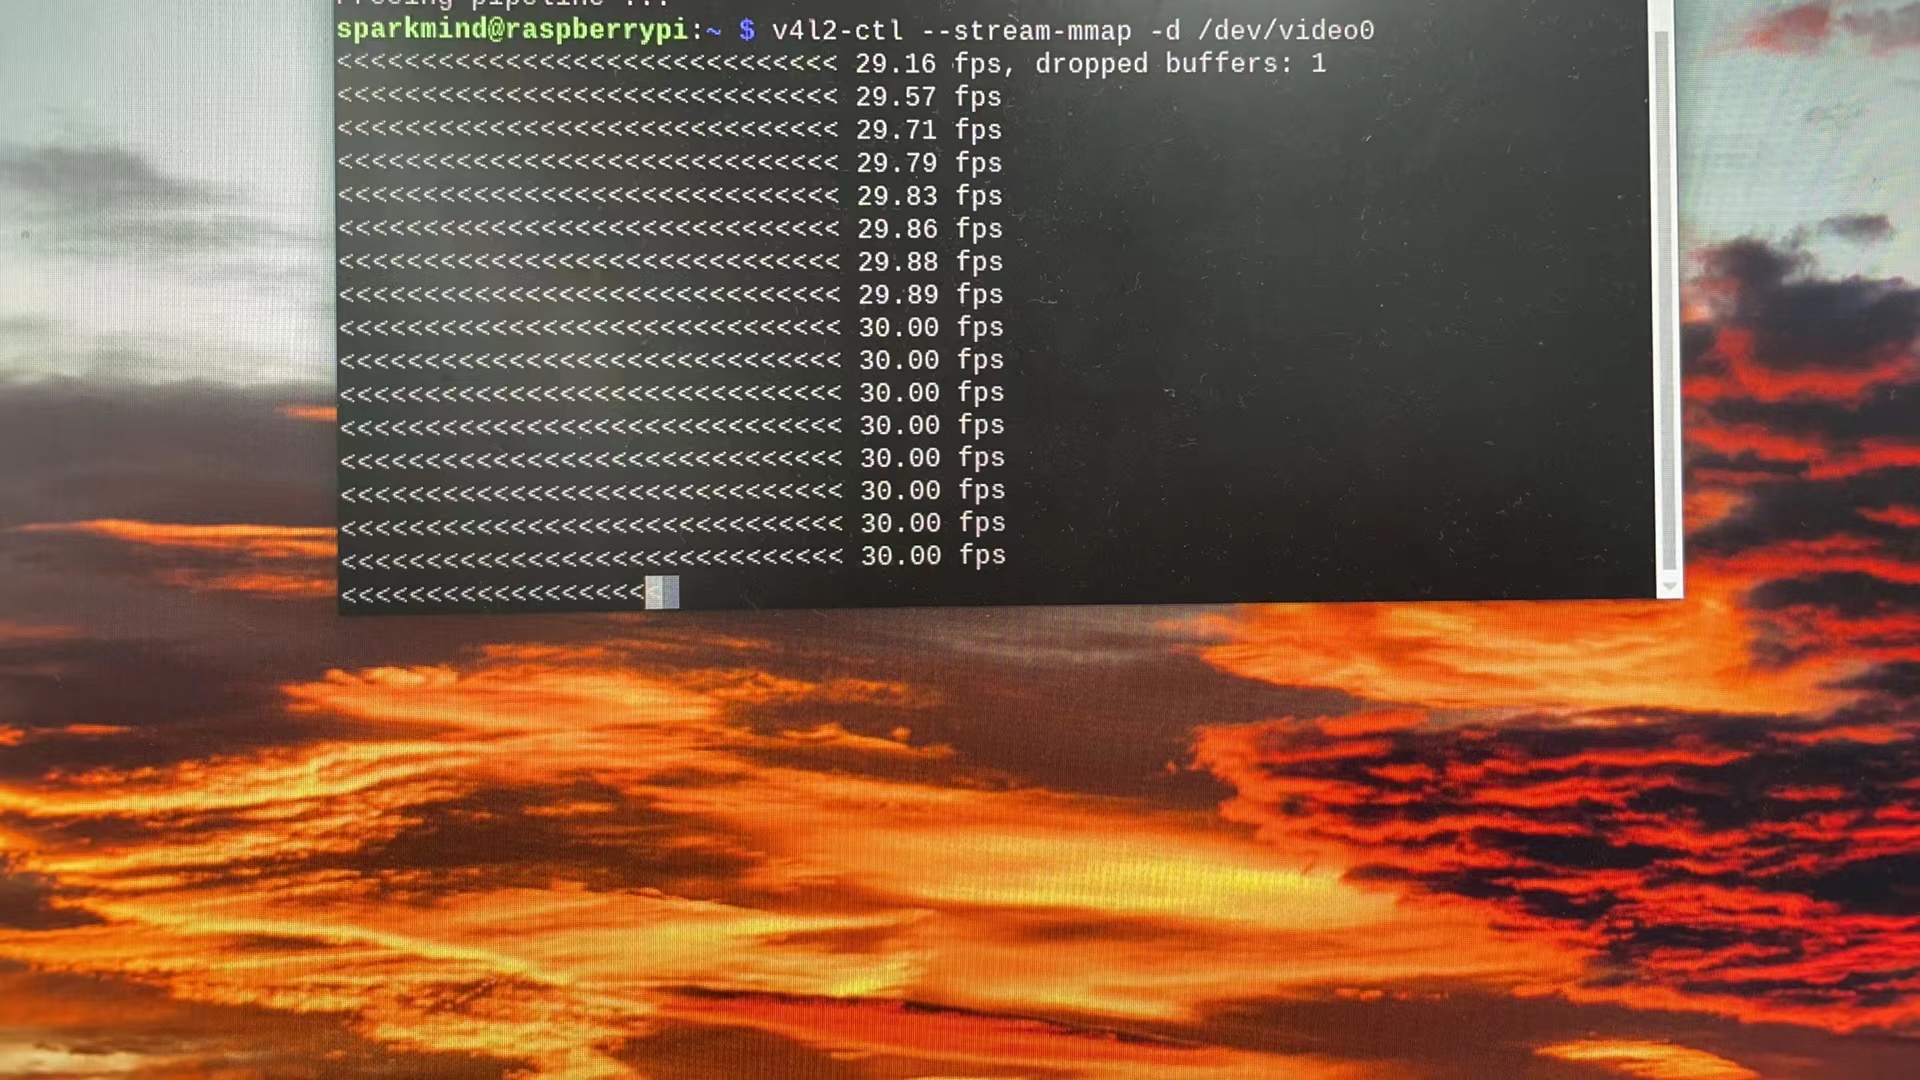
# 0. Download 1. 如果是直接使用树莓派官方提供的镜像和内核可以直接在Annexe中进行下载; 2. 如果是使用第三方提供的内核源码,可以直接下载即可,使用方法相同; 3. 如果是使用yocto进行编译,可以参考yocto相关的流程,`本文档只说明用toolchain做相关驱动开发的流程`; # 1. Pre-check `请仔细确认以下信息,任何一个地方的不一致都有可能造成开发的设备树dtb文件或者驱动ko文件无法加载,或者加载时提示版本不一致亦或是没有任何反应(dmesg无相关提示信息)。` 1. 硬件版本(hardware version):根据官方提示,树莓派5和其他版本的指令和编译出的Image文件会有出入,注意仔细确认自己的硬件版本,然后找到官网上对应版本的编译说明,32bit和64bit的也会有所区别; 2. 官方镜像版本(the sd-card image version):不同的镜像会有所区别注意仔细确认; 3. 交叉编译器版本(the version of the cross compile toolchain):通过测试如果使用不同版本的交叉编译器,这边不同版本的ubuntu apt install出的交叉编译器会有区别ubuntu18.04对应7.4.0;ubuntu22.04对应11.4.0。当使用不同的交叉编译器生成的内核或者驱动加载时会报version dismatch的问题; 4. 内核版本(the version of the kernal):使用uname -r和modinfo 【ko file path】仔细确认内核版本和编译出的驱动是否一致,不一致要先保证一致; 5. 自定义内核(the name of the custom config):如果是在.confg文件中修改了`CONFIG_LOCALVERSION=`注意务必使用4中的指令确认目标硬件和驱动的版本是否一致,否则会有version dismatch的问题。 # 2. Build Kernel 整体过程没有太多问题,按照指令和说明正常操作即可 ## Annexe 1 Very Clear * Useful Dependencies `sudo apt-get update` `sudo apt-get install bc make bison flex libncurses-dev ctags python-sphinx` `sudo apt install crossbuild-essential-arm64`(64bit) * Build Steps `make help` help `make distclean` clean `cd linux` `KERNEL=kernel8` `make ARCH=arm64 CROSS_COMPILE=aarch64-linux-gnu- bcm2711_defconfig` (64bit generate .config) `make ARCH=arm64 CROSS_COMPILE=aarch64-linux-gnu- Image modules dtbs` (do build generate Image and dtbs 64bit) `make modules_install ARCH=arm64 CROSS_COMPILE=aarch64-linux-gnu- INSTALL_MOD_PATH=./modules_install` (put module in target folder) `make dtbs_install ARCH=arm64 CROSS_COMPILE=aarch64-linux-gnu- INSTALL_DTBS_PATH=./modules_install` (put dtbs in target folder) ## SD Card Format To format /dev/mmcblk0 and create two partitions (sdb1 and sdb2) suitable for installing a Raspberry Pi image, you can follow these steps: 1. Unmount the Device (if necessary) First, ensure that the device is not mounted: ```bash sudo umount /dev/mmcblk0* ``` 2. Partition the SD Card Use fdisk to create two partitions: ```bash sudo fdisk /dev/mmcblk0 ``` Inside the fdisk interactive prompt, follow these steps: ``` Delete existing partitions (if any): Press d to delete a partition. If multiple partitions exist, repeat the process for each partition. Create a new partition (for sdb1): Press n to create a new partition. Choose p for primary. Select partition number 1. Press Enter to accept the default starting sector. Choose the size (e.g., +256M for 256MB, typically used for the boot partition). Create the second partition (for sdb2): Press n to create another partition. Choose p for primary. Select partition number 2. Press Enter to accept the default starting sector. Press Enter again to accept the default end sector (uses the remaining space). Write the partition table: Press w to write the changes to the disk and exit fdisk. ``` 3. Format the Partitions Now, format the partitions to the appropriate file systems: Format the first partition (sdb1) as FAT32 (typically used for the boot partition): ```bash sudo mkfs.vfat /dev/mmcblk0p1 ``` Format the second partition (sdb2) as ext4 (typically used for the root filesystem): ```bash sudo mkfs.ext4 /dev/mmcblk0p2 ``` 4. Label the Partitions (Optional) You can label the partitions for easier identification: Label the first partition (sdb1): ```bash sudo fatlabel /dev/mmcblk0p1 BOOT ``` Label the second partition (sdb2): ```bash sudo e2label /dev/mmcblk0p2 ROOTFS ``` 5. Verify the Partition Table You can verify the changes using: ```bash sudo fdisk -l /dev/mmcblk0 ``` This will show you the newly created partitions (mmcblk0p1 and mmcblk0p2). 6. Install Raspberry Pi Image Finally, you can install the Raspberry Pi image: Mount the partitions: ```bash sudo mount /dev/mmcblk0p1 /mnt/boot sudo mount /dev/mmcblk0p2 /mnt/rootfs ``` Copy the files from the Raspberry Pi image to the corresponding partitions: The boot files go to /mnt/boot. The root filesystem goes to /mnt/rootfs. Unmount the partitions after copying the files: ```bash sudo umount /mnt/boot sudo umount /mnt/rootfs ``` The SD card is now prepared with two partitions, ready for use in a Raspberry Pi. # 3. 相机驱动开发 * 以imx390 +GW5200 + max9295a 配max9296a为例 1. 设备树配置:在`linux/arch/arm64/boot/dts/overlays/`中添加自定义的dts文件并在Makefile中添加对应编译选项。编译成功后会生成对应的dtbo文件。将该文件放置在目标设备的/boot/overlays 中,并修改/boot/config.txt. ``` # Automatically load overlays for detected cameras #camera_auto_detect=1 dtoverlay=z_imx390,media-controller=0 ``` [【附件】z_imx390-overlay.dts](/media/attachment/2024/09/z_imx390-overlay.dts) 如果配置没问题可以使用`i2cdetect -l`检查总线配置是否正确,同时使用`i2cdetect -r 对应总线编号` 查看i2c设备是否存在。 2. 驱动开发: 在`linux/drivers/media/i2c/`中添加对应的驱动文件,相机驱动使用v4l2框架. [【附件】z_imx390.c](/media/attachment/2024/09/z_imx390.c) 3. 设备端加载并测试: 编译完成后会生成ko文件使用insmod在target加载,并检查dmesg是否正确。 4. 如果出现一些因为寄存器配置有误导致的异常,可以根据串行解串设备的Datasheet文档确认寄存器地址的对应数据。 `i2ctransfer -y -f 10 w2@0x4a 0x01 0x08 r1` 上面的指令解释如下,-y表示直接确认,-f 10表示对应i2c总线编号,w2表示16bit寄存器地址,r1表示8bit data地址。0x4a表示dev address,0x01 0x08 表示寄存器地址0x0108 # -1. Annexe * Build Documentation https://www.raspberrypi.com/documentation/computers/linux_kernel.html#cross-compile-the-kernel * Kernel Source https://github.com/raspberrypi/linux # -2. Annexe * 如果出现版本问题对照pre-check进行查看  * 如果出现如图所示的问题,可能是输入输出的时间配置lane 等有问题,注意检查  如上问题虽然是按照点亮文件中给的1200MHz进行的ph1-clk的设置,但是实际上修改为1500MHz才达到匹配的频率。 如下图可以确认出串行芯片配解串芯片的通路,然后通过寄存器配置的方式调整修改。 ``` # max9296 config # I2CADDR= 0x90 // I2C address MODE= 16BITREG_BYTEWRITE // I2C write mode REG= 0x0320, 0x2f // mipi phy1-clk 1500Mbps REG= 0x0313, 0x02 // mipi output enable ```   * 即使串行解串相同,也注意不同相机的配置差异  * 如果gst launch 有提示中的错误,可以参考该帖子 ``` WARNING: from element /GstPipeline:pipeline0/GstXvImageSink:xvimagesink0: A lot of buffers are being dropped. Additional debug info: gstbasesink.c(2902): gst_base_sink_is_too_late (): /GstPipeline:pipeline0/GstXvImageSink:xvimagesink0: There may be a timestamping problem, or this computer is too slow. ``` https://stackoverflow.com/questions/59428557/there-maybe-a-timestamping-problem-or-this-computer-is-too-slow * 可以使用v4l2-ctl确认帧率 
dingfeng
2024年9月13日 14:31
1122
0 条评论
转发文档
收藏文档
上一篇
下一篇
评论
手机扫码
复制链接
手机扫一扫转发分享
复制链接
Markdown文件
PDF文档
PDF文档(打印)
分享
链接
类型
密码
更新密码