Public Docs
【模型量化】深度学习模型量化 & 量化理论 & 各平台的量化过程 & 硬件加速
【TVM】TI关于TVM的使用测试与分析
【LLM&LVM】大模型开源工程思维导图
SmartSip
【北航卓越工程师】《汽车前沿技术导论:智能驾驶》讲义
【工具链】Yocto使用介绍——使用Yocto创建一个树莓派的系统镜像
【工具链】使用ssh+dialog指令设定服务器指定用户仅容器访问
【推理引擎】一篇关于模型推理的详细对比与学习
【推理引擎】关于TVM中的Schedule优化详解(On going)
【LLM微调】使用litgpt进行私有数据集模型微调的测试总结
【TVM】在TVM Relay中创建一个自定义操作符
【STT+LLM+TTS】如何使用语音转文字模型+大预言模型+语音生成模型完成一个类人的语音交互机器人
【RAG】 通过RAG构建垂直领域的LLM Agent的方法探索
【RAG】GraphRAG精读与测试(On going)
【AI Agent】MetaGPT精读与学习
【AI Base】Ilya Sutskever 27篇必读论文分享清单
【Nvidia】Jetson AGX Orin/ Jetson Orin nano 硬件测试调试内容(On going)
【BI/DI】LLM Using in BI Testing Scenario (On going)
【Nvidia】How to Activate a Camera on Nvidia Platform in Details
【RAS-PI】树莓派驱动开发
【行业咨询阅读】关注实时咨询和分析
【mobileye】2024 Driving AI
【mobileye】SDS_Safety_Architecture
【yolo】yolov8测试
【nvidia】Triton server实践
【alibaba】MNN(on updating)
【OpenAI】Triton(on updating)
【CAIS】关于Compound AI Systems的思考
【Nvidia】关于Cuda+Cudnn+TensorRT推理环境
【BEV】BEVDet在各个平台上的执行效率及优化(On Updating)
【Chip】AI在芯片设计和电路设计中的应用
【Chip】ChiPFormer
【Chip】关于布线的学习
【Chip】MaskPlace论文精读与工程复现优化
【gynasium】强化学习初体验
【Cadence】X AI
【transformer】MinGPT开源工程学习
【中间件】针对apollo 10.0中关于cyberRT性能优化的深度解读和思考
【Robotics】调研了解当前机器人开发者套件(on updating)
【Robotics】ROS CON China 2024 文档技术整理与感想总结(上2024.12.7,中2024.12.8,下场外产品)
【algorithm】关于模型、数据与标注规范的平衡问题
【nvidia】DLA的学习了解与使用
【nvidia】构建nvidia嵌入式平台的交叉编译环境(其他环境平台可借鉴)
【2025AI生成式大会】2025大会个人总结
【Robotics】 Create Quadruped Robot RL FootStep Training Environment In IsaacLab
【Robotics】如何一个人较为完整的完成一个机器人系统软件算法层面的设计与开发
【VLM】读懂多模态大模型评价指标
【VLM】大模型部署的端侧部署性能与精度评估方法与分析
【Nvidia】Jetson Orin 平台VLM部署方法与指标评测
【Database】向量数据库
【SoC】性能与功耗评估
【MCP】MCP探索
【InnoFrance】一个“关于声音”的有趣项目
【Robotics】写给那些想要快速了解机器人或者具身智能的工程师们
【Robotics】open X Embodiment RT-X 数据集下载与使用和分析
文档发布于【Feng's Docs】
-
+
首页
【gynasium】强化学习初体验
# Gymnasium openai的gym是当前构建强化学习环境并执行强化学习过程的一个非常方便的框架。当前gym已经转移给非盈利组织Farama维护,更名为gymnasium。相较于gym,相关sdk接口有一些调整和修改该,所以使用时需要检查相关版本的代码和文档 因为是刚开始接触强化学习和gym的使用,所以阅读了文档手册,手册中的例子能够较为容易的执行起来。所以为了了解手册中的训练智能体过程的核心流程,自己定义了一个目标,训练一个能够完成7巧板拼接为方块的智能体。首先我们先学习了解一个别人的2D A点到B点的一个工程,然后再完成自己的一个更复杂的任务 整个过程包括: 1. Create a Custom enviroment 2. Recording agent 3. training agent 4. test 这么几个核心步骤,帮助学习了解强化学习的过程。 原本文档中的例子跟着操作比较简单,这里不做更多的学习记录。 ## Learn a project https://www.youtube.com/watch?v=AoGRjPt-vms https://github.com/johnnycode8/gym_custom_env 整个任务是训练一个智能体,智能在一个2d的棋盘格运动,通过强化学习训练这个智能体完成自己到达棋盘格中目标位置的目标。  ### 构建问题 `v0_warehouse_robot.py` 定义了一些基础条件 ``` python # 定义了机器人可做的四种操作 class RobotAction(Enum): LEFT=0 DOWN=1 RIGHT=2 UP=3 # 定义了地图,__str__方便对地图进行可视化,每个格子可能是地板,可能是机器人,可能是目标位置三种类型 # _ _ _ _ _ # _ _ _ T _ # _ _ _ _ _ # R _ _ _ _ class GridTile(Enum): _FLOOR=0 ROBOT=1 TARGET=2 def __str__(self): return self.name[:1] # 定义了整个环境 class WarehouseRobot: # 初始化地图的大小 def __init__(self, grid_rows=4, grid_cols=5, fps=1): self.grid_rows = grid_rows self.grid_cols = grid_cols self.reset() # 每次操作的间隔帧率,主要是测试环境定义是否正确用的 self.fps = fps self.last_action='' # pygame是为了让human模式的时候更加直观 self._init_pygame() def _init_pygame(self): # 初始化pygame和pygame的显示 pygame.init() # initialize pygame pygame.display.init() # Initialize the display module # 定义游戏的时钟 self.clock = pygame.time.Clock() # 定义了pygame中的基础字体和大小 self.action_font = pygame.font.SysFont("Calibre",30) self.action_info_height = self.action_font.get_height() # 定义了每个小格子的尺寸 self.cell_height = 64 self.cell_width = 64 self.cell_size = (self.cell_width, self.cell_height) # 定义窗口尺寸,这个是由每个小格子的尺寸和格子的长宽数量以及文字框的高度计算的 self.window_size = (self.cell_width * self.grid_cols, self.cell_height * self.grid_rows + self.action_info_height) # 执行pygame的窗口 self.window_surface = pygame.display.set_mode(self.window_size) # 在pygame的环境给各个格子的类型一个图片,图片基于cell的尺寸进行resize file_name = path.join(path.dirname(__file__), "sprites/bot_blue.png") img = pygame.image.load(file_name) self.robot_img = pygame.transform.scale(img, self.cell_size) file_name = path.join(path.dirname(__file__), "sprites/floor.png") img = pygame.image.load(file_name) self.floor_img = pygame.transform.scale(img, self.cell_size) file_name = path.join(path.dirname(__file__), "sprites/package.png") img = pygame.image.load(file_name) self.goal_img = pygame.transform.scale(img, self.cell_size) # 重置,机器人放置到0,0的位置,target任意放置在某一个位置 def reset(self, seed=None): # Initialize Robot's starting position self.robot_pos = [0,0] # Random Target position random.seed(seed) self.target_pos = [ random.randint(1, self.grid_rows-1), random.randint(1, self.grid_cols-1) ] # 执行具体的动作,代码比较好理解,返回机器人是否到达目标 def perform_action(self, robot_action:RobotAction) -> bool: self.last_action = robot_action # Move Robot to the next cell if robot_action == RobotAction.LEFT: if self.robot_pos[1]>0: self.robot_pos[1]-=1 elif robot_action == RobotAction.RIGHT: if self.robot_pos[1]<self.grid_cols-1: self.robot_pos[1]+=1 elif robot_action == RobotAction.UP: if self.robot_pos[0]>0: self.robot_pos[0]-=1 elif robot_action == RobotAction.DOWN: if self.robot_pos[0]<self.grid_rows-1: self.robot_pos[0]+=1 # Return true if Robot reaches Target return self.robot_pos == self.target_pos # 渲染结果在命令行和pygame def render(self): # Print current state on console for r in range(self.grid_rows): for c in range(self.grid_cols): if([r,c] == self.robot_pos): print(GridTile.ROBOT, end=' ') elif([r,c] == self.target_pos): print(GridTile.TARGET, end=' ') else: print(GridTile._FLOOR, end=' ') print() # new line print() # new line self._process_events() # clear to white background, otherwise text with varying length will leave behind prior rendered portions self.window_surface.fill((255,255,255)) # Print current state on console for r in range(self.grid_rows): for c in range(self.grid_cols): # Draw floor pos = (c * self.cell_width, r * self.cell_height) self.window_surface.blit(self.floor_img, pos) if([r,c] == self.target_pos): # Draw target self.window_surface.blit(self.goal_img, pos) if([r,c] == self.robot_pos): # Draw robot self.window_surface.blit(self.robot_img, pos) text_img = self.action_font.render(f'Action: {self.last_action}', True, (0,0,0), (255,255,255)) text_pos = (0, self.window_size[1] - self.action_info_height) self.window_surface.blit(text_img, text_pos) pygame.display.update() # Limit frames per second self.clock.tick(self.fps) def _process_events(self): # Process user events, key presses for event in pygame.event.get(): # User clicked on X at the top right corner of window if event.type == pygame.QUIT: pygame.quit() sys.exit() if(event.type == pygame.KEYDOWN): # User hit escape if(event.key == pygame.K_ESCAPE): pygame.quit() sys.exit() ``` ### 构建完问题和基础条件,然后就是构建GYM环境 ``` python # 导入需要的库 import gymnasium as gym from gymnasium import spaces from gymnasium.envs.registration import register from gymnasium.utils.env_checker import check_env import v0_warehouse_robot as wr import numpy as np # 注册一个环境,id会在调用gym.make的时候被用到,entry_point是后面定义的继承gym.Env的类 register( id='warehouse-robot-v0', # call it whatever you want entry_point='v0_warehouse_robot_env:WarehouseRobotEnv', # module_name:class_name ) # 定义自己的环境,继承gym.Env class WarehouseRobotEnv(gym.Env): # metadata is a required attribute # render_modes in our environment is either None or 'human'. # render_fps is not used in our env, but we are require to declare a non-zero value. metadata = {"render_modes": ["human"], 'render_fps': 4} def __init__(self, grid_rows=4, grid_cols=5, render_mode=None): self.grid_rows=grid_rows self.grid_cols=grid_cols self.render_mode = render_mode # 问题初始化 self.warehouse_robot = wr.WarehouseRobot(grid_rows=grid_rows, grid_cols=grid_cols, fps=self.metadata['render_fps']) # 定义问题的动作空间,为机器人可以执行的行为,即上下左右,Box和Discrete分别用来定义空间是连续的,还是离散的。例如动作空间通常是离散的,观察空间可能是离散的,可能是连续的。在这个问题里,观察空间是连续的,维度为4分别是rob和target在网格中的横向和纵向的坐标,取值范围为0-最大值。所以observation_space定义成了Box self.action_space = spaces.Discrete(len(wr.RobotAction)) self.observation_space = spaces.Box( low=0, high=np.array([self.grid_rows-1, self.grid_cols-1, self.grid_rows-1, self.grid_cols-1]), shape=(4,), dtype=np.int32 ) # Gym required function (and parameters) to reset the environment def reset(self, seed=None, options=None): super().reset(seed=seed) # gym requires this call to control randomness and reproduce scenarios. # Reset the WarehouseRobot. Optionally, pass in seed control randomness and reproduce scenarios. self.warehouse_robot.reset(seed=seed) # Construct the observation state: # [robot_row_pos, robot_col_pos, target_row_pos, target_col_pos] obs = np.concatenate((self.warehouse_robot.robot_pos, self.warehouse_robot.target_pos)) # Additional info to return. For debugging or whatever. info = {} # Render environment if(self.render_mode=='human'): self.render() # Return observation and info return obs, info # Gym required function (and parameters) to perform an action def step(self, action): # Perform action target_reached = self.warehouse_robot.perform_action(wr.RobotAction(action)) # Determine reward and termination reward=0 terminated=False if target_reached: reward=1 terminated=True # Construct the observation state: # [robot_row_pos, robot_col_pos, target_row_pos, target_col_pos] obs = np.concatenate((self.warehouse_robot.robot_pos, self.warehouse_robot.target_pos)) # Additional info to return. For debugging or whatever. info = {} # Render environment if(self.render_mode=='human'): print(wr.RobotAction(action)) self.render() # Return observation, reward, terminated, truncated (not used), info return obs, reward, terminated, False, info # Gym required function to render environment def render(self): self.warehouse_robot.render() # For unit testing if __name__=="__main__": env = gym.make('warehouse-robot-v0', render_mode='human') # Use this to check our custom environment # print("Check environment begin") # check_env(env.unwrapped) # print("Check environment end") # Reset environment obs = env.reset()[0] # Take some random actions while(True): rand_action = env.action_space.sample() obs, reward, terminated, _, _ = env.step(rand_action) if(terminated): obs = env.reset()[0] ``` ### 测试训练与推理 ``` python ''' Example of using Q-Learning or StableBaseline3 to train our custom environment. 例子中使用了两种强化学习策略,一个是Q-Learning,一个是StableBaseline3 的Actor-Critic Q-Learning是一种基于价值的强化学习算法,它试图学习一个策略,该策略能够最大化预期的累积奖励。它通过迭代更新Q值来实现这一点,Q值表示在给定状态下采取特定动作的预期效用。 DQN是Q-Learning的深度学习版本,它使用深度神经网络来近似Q函数,这使得它能够处理高维的、连续的或者复杂的状态空间。 在Stable Baselines3中,DQN算法被实现为一个易于使用的类,它封装了DQN的所有复杂性,使得用户可以轻松地在各种环境中应用DQN算法。SB3提供了DQN的多种变体,包括基本的DQN以及一些改进版本,如Double DQN和Dueling DQN。 SB3不仅提供了DQN算法的实现,还提供了其他多种强化学习算法的实现,如PPO、A2C、SAC等。这些算法都是经过优化的,可以直接在各种环境中使用。 通过SB3,用户可以轻松地在自定义环境中实现Q-Learning或DQN。用户只需要定义环境和网络结构,然后创建一个DQN模型实例并调用其.learn()方法即可开始训练 ''' import argparse import gymnasium as gym import numpy as np import matplotlib.pyplot as plt import random import pickle from stable_baselines3 import A2C import os import v0_warehouse_robot_env # Even though we don't use this class here, we should include it here so that it registers the WarehouseRobot environment. parser = argparse.ArgumentParser(description='warehouse') parser.add_argument('--is_test', action='store_true', default=False) parser.add_argument('--model_nb', type=str, default="4000") args = parser.parse_args() # 训练和测试 q-learning def run_q(episodes, is_training=True, render=False): env = gym.make('warehouse-robot-v0', render_mode='human' if render else None) if(is_training): # If training, initialize the Q Table, a 5D vector: [robot_row_pos, robot_row_col, target_row_pos, target_col_pos, actions] q = np.zeros((env.unwrapped.grid_rows, env.unwrapped.grid_cols, env.unwrapped.grid_rows, env.unwrapped.grid_cols, env.action_space.n)) else: # If testing, load Q Table from file. f = open('v0_warehouse_solution.pkl', 'rb') q = pickle.load(f) f.close() # Hyperparameters learning_rate_a = 0.9 # alpha or learning rate discount_factor_g = 0.9 # gamma or discount rate. Near 0: more weight/reward placed on immediate state. Near 1: more on future state. epsilon = 1 # 1 = 100% random actions # Array to keep track of the number of steps per episode for the robot to find the target. # We know that the robot will inevitably find the target, so the reward is always obtained, # so we want to know if the robot is reaching the target efficiently. steps_per_episode = np.zeros(episodes) step_count=0 for i in range(episodes): if(render): print(f'Episode {i}') # Reset environment at teh beginning of episode state = env.reset()[0] terminated = False # Robot keeps going until it finds the target while(not terminated): # Select action based on epsilon-greedy if is_training and random.random() < epsilon: # select random action action = env.action_space.sample() else: # Convert state of [1,2,3,4] to (1,2,3,4), use this to index into the 4th dimension of the 5D array. q_state_idx = tuple(state) # select best action action = np.argmax(q[q_state_idx]) # Perform action new_state,reward,terminated,_,_ = env.step(action) # Convert state of [1,2,3,4] and action of [1] into (1,2,3,4,1), use this to index into the 5th dimension of the 5D array. q_state_action_idx = tuple(state) + (action,) # Convert new_state of [1,2,3,4] into (1,2,3,4), use this to index into the 4th dimension of the 5D array. q_new_state_idx = tuple(new_state) if is_training: # Update Q-Table q[q_state_action_idx] = q[q_state_action_idx] + learning_rate_a * ( reward + discount_factor_g * np.max(q[q_new_state_idx]) - q[q_state_action_idx] ) # Update current state state = new_state # Record steps step_count+=1 if terminated: steps_per_episode[i] = step_count step_count = 0 # Decrease epsilon epsilon = max(epsilon - 1/episodes, 0) env.close() # Graph steps sum_steps = np.zeros(episodes) for t in range(episodes): sum_steps[t] = np.mean(steps_per_episode[max(0, t-100):(t+1)]) # Average steps per 100 episodes plt.plot(sum_steps) plt.savefig('v0_warehouse_solution.png') if is_training: # Save Q Table f = open("v0_warehouse_solution.pkl","wb") pickle.dump(q, f) f.close() # 训练A2C def train_sb3(): # 定义模型和日志的保存位置 model_dir = "models" log_dir = "logs" os.makedirs(model_dir, exist_ok=True) os.makedirs(log_dir, exist_ok=True) # 创建问题环境 env = gym.make('warehouse-robot-v0', grid_rows=6, grid_cols=6) # 使用A2C策略创建强化学习模型,'MlpPolicy'指定了使用多层感知机(MLP)作为策略网络。然后可以通过tesnsorboard查看日志,verbose=1标志在命令行展示日志,后面会解释日志内容 model = A2C('MlpPolicy', env, verbose=1, device='cuda', tensorboard_log=log_dir) # 定义每次学习的周期,注意如果空间定义过大而学习周期过短,可能导致agent无法完成目标从而导致结果不收敛,当从日志中观察学习结果复合预期后手动crtl+c停止 TIMESTEPS = 1000 iters = 0 while True: iters += 1 # stable_baseline3的库只需要通过一行learn即可开始训练 model.learn(total_timesteps=TIMESTEPS, reset_num_timesteps=False) # train # 完成一次学习周期,保存一次模型 model.save(f"{model_dir}/a2c_{TIMESTEPS*iters}") # Save a trained model every TIMESTEPS ''' 当训练开始时会看到如下的打印信息: ep_len_mean(Episode Length Mean):表示平均每个episode(或称为“回合”)的长度。如果模型已经学会了有效的策略,你可能期望看到较短的episode长度,因为智能体能够更快地完成任务。 ep_rew_mean(Episode Reward Mean):表示每个episode的平均奖励。对于大多数任务来说,你希望这个值接近或等于最大可能的奖励,这表明智能体几乎总是能够成功完成任务。 value_loss(Value Loss):价值损失是衡量价值函数预测准确性的一个指标。如果价值损失很低,这可能表明价值函数已经很好地学习了状态的价值。 policy_loss(Policy Loss):策略损失是衡量策略更新效果的一个指标。在A2C中,一个非常低的策略损失可能表明策略已经相对稳定,没有太大的改进空间。 entropy_loss(Entropy Loss):熵损失是衡量策略探索性的一个指标。一个非零的熵损失值表明策略仍然在探索不同的动作,这对于避免过早收敛到次优策略是重要的。 explained_variance(Explained Variance):解释方差是衡量价值函数预测稳定性的一个指标。接近1的值表明价值函数能够很好地预测回报。 learning_rate(Learning Rate):学习率是控制模型参数更新步长的参数。如果学习率设置得太低,模型可能需要很长时间才能收敛;如果太高,则可能导致训练不稳定。 n_updates(Number of Updates):这表示模型更新的次数。大量的更新可能意味着模型已经训练了很长时间。 time_elapsed(Time Elapsed) 和 total_timesteps(Total Timesteps):这些指标提供了训练进度的时间上下文,帮助你了解训练的持续时间和覆盖的范围 如下ep_len_mean 数值很小如图6*6的格子,需要大概平均5.几步就可以达到目标,基本表示模型已经收敛。ep_rew_mean为1,表示模型基本能够获得最大奖励。 训练损失较低,且平稳。整体上看基本可以手动停止了 ------------------------------------- | rollout/ | | | ep_len_mean | 5.83 | | ep_rew_mean | 1 | | time/ | | | fps | 1336 | | iterations | 200 | | time_elapsed | 0 | | total_timesteps | 781000 | | train/ | | | entropy_loss | -0.000468 | | explained_variance | 0.0 | | learning_rate | 0.0007 | | n_updates | 156199 | | policy_loss | 1.27e-08 | | value_loss | 1.17e-07 | ------------------------------------- ''' # 用来测试训练好的模型 def test_sb3(render=True): env = gym.make('warehouse-robot-v0', grid_rows=6, grid_cols=6, render_mode='human' if render else None) # 加载模型 model = A2C.load('models/a2c_' + args.model_nb, env=env) # 执行测试 obs = env.reset()[0] terminated = False while True: action, _ = model.predict(observation=obs, deterministic=True) # Turn on deterministic, so predict always returns the same behavior obs, _, terminated, _, _ = env.step(action) if terminated: break if __name__ == '__main__': # Train/test using Q-Learning # run_q(1000, is_training=True, render=False) # run_q(1, is_training=False, render=True) # Train/test using StableBaseline3 # if args.is_test: test_sb3() else: train_sb3() ``` 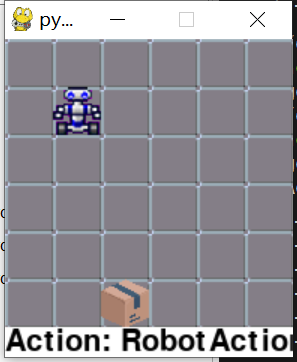 # 扩展 了解完使用gymnasium框架下使用A2C模型策略,进行强化学习的过程。本着对问题的好奇,我们沿着上面的例子继续探索。我发现,当grid map的尺寸持续增大,当变成8 * 8 的方格时,整个过程的收敛速度就变得很慢了,当变成10 * 10时整体就非常难收敛了。这就是`sparse reward`的问题,即针对task本身设定更加详细的奖励条件和奖励方式,来引导agent完成相关任务。 针对问题本身我做了几种尝试: 1. 当物体接近目标但是没有到达目标时,给予一定的奖励,可以按照横纵格的方式,也可以更直观按照欧氏距离的方式进行分段。可以在接近目标事给与奖励,也可以在不接近目标时不给予奖励,或者直接给予惩罚。通过这样的方式可以引导智能体接近目标。`实践过程发现,奖励机制要根据grid的尺寸进行调节,避免出现因最终到达目标后的奖励和引导性奖励区别不大而使得智能体出现在一个接近位置绕圈获得奖励,从而不收敛的情况。` ``` python if not self.target_reached: diff_x = abs(self.robot_pos[0] - self.target_pos[0]) diff_y = abs(self.robot_pos[1] - self.target_pos[1]) diff = math.sqrt(diff_x**2 + diff_y**2) # Check if the robot is in the same row or column as the target if diff < 2.0: self.proximity_reward = 0.05 elif diff < 4.0: self.proximity_reward = 0.1 elif diff < 8.0: self.proximity_reward = 0.2 else: self.proximity_reward = -0.01 ``` 2. 当地图进一步变大时,需要针对第一种情况做更细粒度的区分,这是不太好调节的。这时候,我想到了另一个方案,即我们玩游戏探索位置地图的策略。对地图中的网格进行划分,定义为探索过和未探索过的两种形式。`当agent探索到为踩到的cell时给予奖励,在走到重复走到的位置时不给予奖励,从而引导智能体探索没有探索过的区域`。 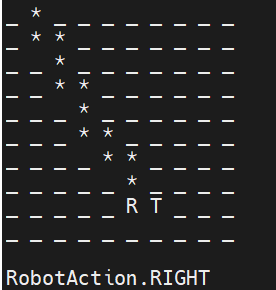 ``` python self.target_reached = self.robot_pos == self.target_pos self.proximity_reward = 0.0 if not self.target_reached: if not self.bool_array[self.robot_pos[0]][self.robot_pos[1]]: self.bool_array[self.robot_pos[0]][self.robot_pos[1]] = True self.proximity_reward = 0.001 else: self.proximity_reward = 0.0 ``` `这里同样要注意奖励分配,我遇到一种模型收敛的情况,在10*10的地图中,将探索奖励设定为0.1,达到目标奖励设定为1。结果,当模型走到最远位置时,因为实际奖励已经超过了reach奖励,从而agent会尝试探索全图,而非达到目标。这里要注意根据grid尺寸进行reward调整。`从这种情况也看出,强化学习在处理高维精细化问题解决时,需要将task的条件进行精细化设定,否则不容易达到期望效果。当然也可以直接对学习模型本身进行调整和修改,即使用更高级的算法。 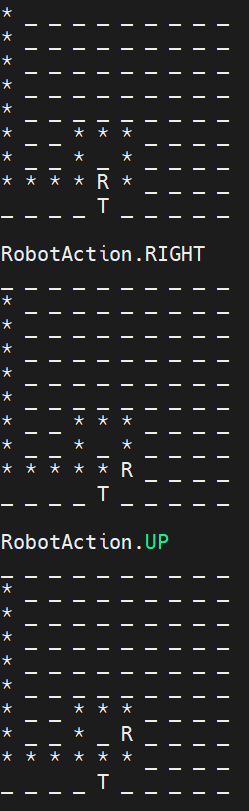 3. 方向奖励。处理距离奖励,更直接的方式是,给与方向奖励。即agent朝向target移动时给与奖励。 4. 针对奖励机制,在测试时发现,即使是同样的奖励规则,也可能因为奖励设置不当取得反效果。 * 增加近端奖励的幅度:如果近端奖励太小,可能不足以引导智能体。尝试增加了近端奖励的值,使其对智能体的行为有更大的影响。 * 减少负奖励:在大网格中,远离目标的负奖励可能会导致智能体过于保守,不敢探索。可以考虑减少负奖励的幅度。
dingfeng
2024年11月14日 16:13
825
0 条评论
转发文档
收藏文档
上一篇
下一篇
评论
手机扫码
复制链接
手机扫一扫转发分享
复制链接
Markdown文件
PDF文档
PDF文档(打印)
分享
链接
类型
密码
更新密码